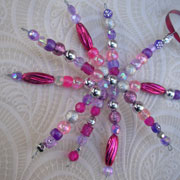
Hi from here on Sunday night!!! I thought I would post the Snowflake tutorial from last week's
Madame B here, in case anyone missed it and wants to make some for Chrissy! Have Fun!
MADAME BUTTERFLY'S CREATIVE CABINET
This week’s PROJECT ... CREATE A SNOWFLAKE!
Here's a fun and simple project to make for Christmas !!!Its approaching fast and these Snowflakes are quick and simple to make! You can add them to your own tree, give them as presents, tie them on to the top of presents or even get your kids to make their own special one to hangup too! Lets Get Started ...
YOU WILL NEED ...Lots of Coloured Sparkly BeadsA Roll of thin Bendable WIRE Small Pointy Nose Pilers ( or jewellers pilers)Small Wire Cutters ( or jewellers cutters)A length of Ribbon All of the above should be available at your local craft store!
TO CREATE IT ...1. Cut five pieces of wire from the roll. They should each be approx 20cm long.
2. Line them up next to each other and thread all of them through a bead. Place the bead in the middle and then twist the wires tightly at either side of the bead and splay them out like a star! The bead should now not be able to move.
3.One at a time, start threading beads of different colours and sizes onto each piece of wire. Push each one down tightly. Leave a gap of about one centimetre at the end. If it is longer, just take your pilers and cut it to size.
4. Take your pointy nose pilers and bend this end into a loop, place the end back into the last bead to make it neat.
5.When you have completed each beaded arm and loop, splay all the wire arms out to form a Sparkly and beautiful Snowflake.
6. Use a length of ribbon threaded through one of the loops to hang your masterpiece!


1 Comments:
I saw these, first at Flickr and followed the link to your Gallery site. I've made two so far and love them. Thank you so much for the great tutorial.
Post a Comment
<< Home